Tuesday, February 24, 2015

Stenciling on art journal pages

Last week I shared with you some art journaling pages that I had just completed.  Several people wanted to see the step by step process of these pages with photos.  If you click on this link it will take you to the Artistcellar blog where I have shared the photos and process that went into creating these pages.


So if you're interested and have a few minutes I invite you to grab an appropriate beverage and take a look!  Today is my actual physical moving day.  Whew, the studio took days to pack up.  I'm sure my new one will look nice a tidy for a while.  I have set up some posts for the next month.  I'll keep you all posted.
Thanks for stopping by, as always I truly appreciate your visit.  Hugs, Renee xx

Wednesday, February 18, 2015

Art Journal Pages with Studio Glaze

I love the new StazOn Studio Glaze product for art journal pages.  They can add just a hint of color to your pages or can be used for very intense colors, your choice.  Today I'm sharing a two page art journal spread, the photo is here and the directions can be found on the IMAGINE Crafts blog.  Here is the link.


I hope you'll pop over and take a look.  I'd love to hear what you think.  Hugs ~ Renee xx


Tuesday, February 17, 2015

Artistcellar Stenciled Tag

Every Tuesday I use an Artistcellar stencil to create a project.  Today I made a tag using the cloisonne background that I've been experimenting with the last couple of weeks.  Here is the tag, if you would like to see the tutorial for this it is posted on the Artistcellar blog today.  Here is the link.


 Some of you may have noticed in my comments earlier that we have recently sold our house and will be moving.  If I seem a little distant or distracted that will be why.  I will be posting on my regular days but may not get back to you with comments as quickly as normal.  I have a lot of packing up to do around here, my studio is half packed, I'm just keeping the things out that I need over the next month or so.  I've enjoyed my home and garden here in New England but I'm afraid the weather and size of the house are just getting to be a bit too much for these old folks!  We're looking forward to warmer weather and less upkeep.  I'll share my adventures with you along the way.
Big Hugs to all of you,  Renee xx


Friday, February 13, 2015

Craft Stampers Challenge Continues::Stenciling!

This month the Take It Make It Challenge is a fun and easy one....just use stencils in your work along with some stamping.  I decided to do a tag that incorporates a stencil, gel medium and some heavy embossing powder.

I started by stamping one of Dyan Reaveley's "Strength" girls on a tag and a scrap piece of paper.  I trimmed out the image on the scrap paper to serve as a mask.

The mask will protect the stamped image as I only want to stencil around it as a background effect.


Next I place my Dreamweaver stencil over the tag and applied an ample amount of IMAGINE Crafts new Turquoise Iridescent Creative Medium paste through the stencil with a palette knife.  While the paste was still wet, I sprinkled Ultra Thick Embossing Enamel powder over the paste and melted it with my heat tool.  Now I have an iridescent dimensional effect on the tag.


I wanted to add background color to this so I colored some Gelatos on top of the stenciling and blended them with a baby wipe.


I colored in the image with Copic and Memento markers; then inked the edges with StazOn Gothic Purple ink.  I hit some of the high points of the stenciling with the ink pad to drag the purple color throughout the tag. I was in a Diva mood so I stamped the word, cut it out and inked the edges with the purple pad and glued it over her eyes.


To add a little bling I sprayed Sheer Shimmer Spritz in Gold and let it pool in the cracks of the stenciling.  The buttons were colored to match with StazOn Studio Glaze and more Gold Sheer Shimmer was sprayed on them.  When the buttons were dry they were glued on top of the pink ribbon tied to the top.


This is just another example of different ways to use a stencil.  Just be sure and wash your stencils immediately after using products like gesso and gel mediums otherwise the intricate designs could become blocked.  I hope you will join in the fun at the Craft Stampers Take It Make It Challenge this month, there are prizes to be won and a chance to be published in the CS magazine!

Take care ~ hugs, Renee xx

Tuesday, February 10, 2015

A Cloisonne Effect using Stencils

It is Tuesday so on my calendar it is Artistcellar day.  Today I made a tag and used a stencil to put some extreme texture in the background.  If you want to see the steps it takes to make this project just keep reading.


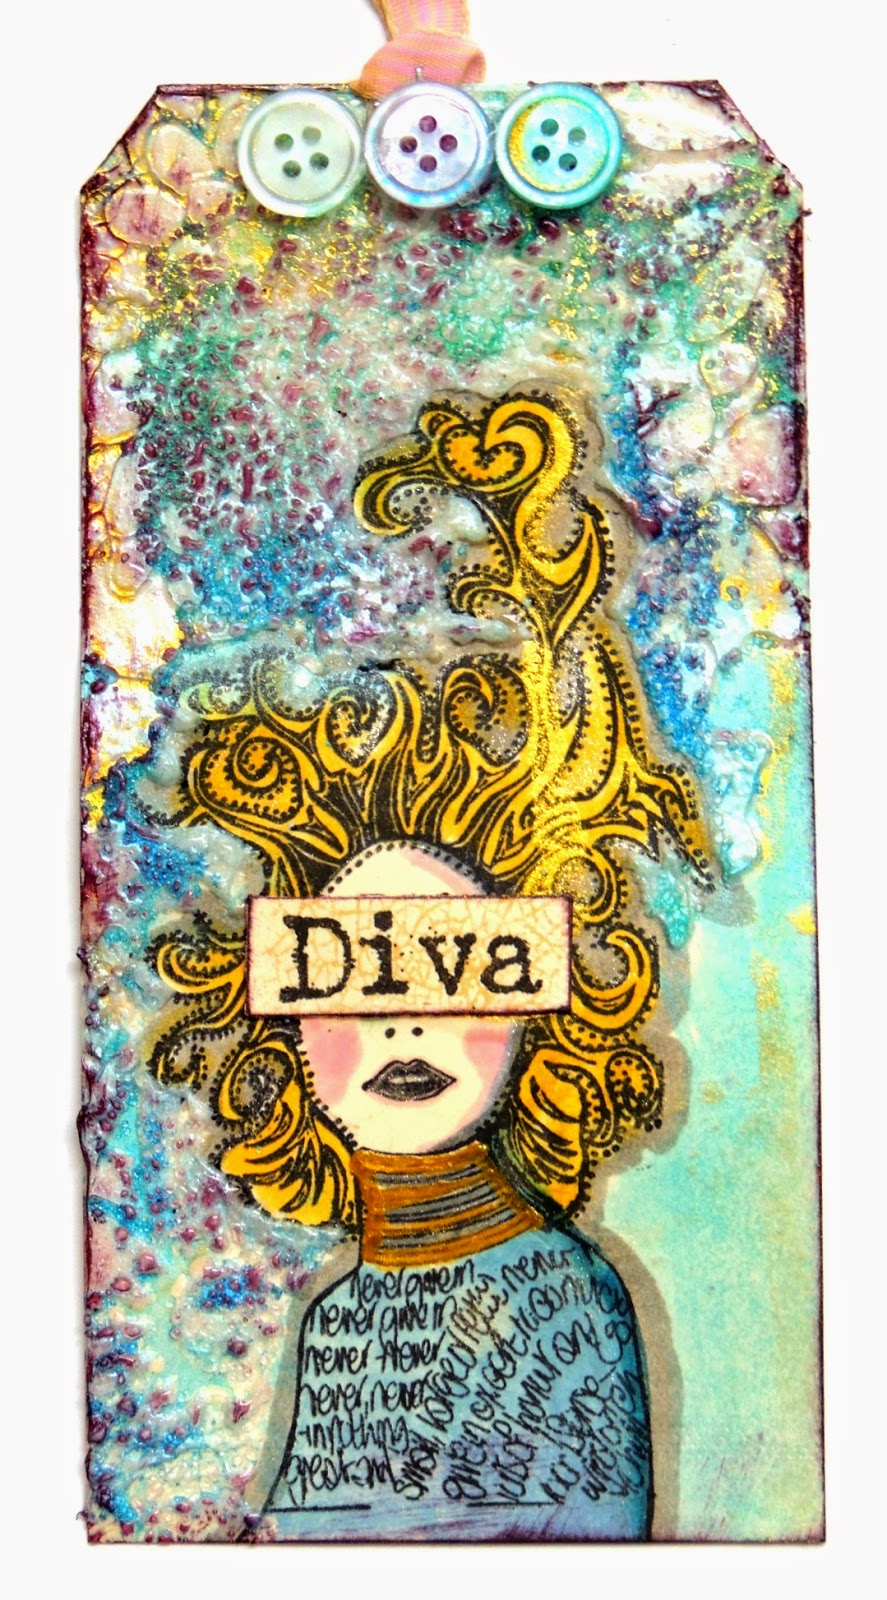
I started with a Ranger manila tag that measures 3" by 6" and stamped an image from Dyan Reaveley's collection called "Strength".  I stamped a mask on a piece of scratch paper at the same time using the same stamp.


I trimmed out the masking piece and placed it over my image so I can use Creative Medium Green Iridescent paste on the tag without applying it to the image.


This is when the fun begins.  I placed the Sea Foam stencil over the tag and used a palette knife to apply the CM Green paste onto most of the tag.  When I had applied an ample coating of the paste, I lifted the stencil straight up so I wouldn't smear it and discarded the masking piece.  To maximize the texture I poured Ultra Thick Embossing Enamel powder onto the paste and melted it with my heat gun.  Now I have texture similar to cloisonne!


You can see how the light plays off of the iridescence of the paste but now I'm going to add more color.  I colored Metallic Gelatos all over the back ground.


The Metallic Mint and Blueberry Gelatos are easily blended with your finger but I chose to use a baby wipe to activate and blend the colors.  When this was to my satisfaction I inked the edge of the tag with StazOn Gothic Purple ink.


The image was colored in with Copic and Momento pens.  Then I attached some roses out of my stash, added some ribbon and a title for my girl, "L'Artiste".  The roses and top part of the tag were sprayed with Sheer Shimmer Sparkle and Gold to add a touch of bling.


Thanks for stopping by today.  I am having a lot of fun playing with this technique this week as I am pretty much snowed in!  Join me on Friday if you have time, I'll be sharing another stenciling project for Craft Stampers Take It Make It Challenge.  I hope to see you then.  Hugs ~ Renee xx

Friday, February 6, 2015

The February Challenge~Show Us Your Stenciling


The February Challenge with Craft Stamper will be "Take A Technique": Stenciling.  To enter the challenge just create a project that includes some stenciling and, of course, stamping.  There is no special stenciling technique that needs to be used just any kind of stenciling.  If you don't own any stencils you can still participate by making your own by using die cuts or cutting your own stencil out of plastic or paper.  Be creative!  Here is what I created as my first project.  It is a 6" by 6" canvas with some stenciling.


I began by covering my canvas with gesso and allowing it to dry.  I used StazOn Studio Glaze to create the colorful background.

When I had color then I added some random stamping.  When the stamping was to my liking I used some Artistcellar stencils to add texture to the canvas with gesso.  The rays came from the Divine stencil which is part of the Sacred Hearts series.  Then I added the circles and squares from Dyan Reaveley's Chequered Dots stencil.  After the canvas had dried then I worked on my central image, a boy and his dog.


The image is an old one from Stampers Anonymous but I still love it.  I colored this with the same StazOn Studio Glaze.  It was stamped on glossy cardstock so I used rubbing alcohol to move the colors around and blend them.  The red Studio Glaze was applied directly to the number five which makes the color very deep and shiny.  Then I used pop dots to adhere this to the canvas.  A simple knob and some ribbon on the top and this project is done!


Join in the fun, you have plenty of time!  Stay warm ~ Hugs, Renee xxx

Tuesday, February 3, 2015

Art Journaling with Stencils

It is Tuesday, so it must be Artistcellar Day!  I created a two page spread using my stencils today and a new stamp.


Here are the steps I went through to do these pages.  First I gessoed both pages lightly.  When the gesso was dry I stamped Dyan Reaveley's number stamp randomly on both pages too.


Next I applied Blue, Teal and Purple Gelatos to the pages and sprayed water on them to blend the colors.


I placed my Sea Foam stencil on the pages, sprayed more water and blotted it with a paper towel.  This way I could lift off just a little of the color.  Next I stamped Donna Downey Studios stamp called "She Pauses" on the page using StazOn Jet Black ink.


I stenciled my Believe stencil on the opposite page with gesso and let it dry.  Her face received a light coating of gesso at this point.  Now I had a great surface to use Pan Pastels on to give her some color.  All the little bits here and there on the pages are past mistakes that were recycled in this project.


There you have it!  Now it is your turn to get those stencils out and have some fun.  It sure beats shoveling snow.  :-)  Be safe, stay warm.  Hugs ~ Renee xx