Friday, May 30, 2014

Have you seen the summer edition of Take Ten?


I just received my "artist comp" copy of  Take Ten magazine.  Much to my surprise they gave my work a two page spread showing some stenciled cards that I made using "Dina Wakley's" style and some of her stencils.  I sent these in for the stenciled card challenge about 6 months ago.


There is a lot of amazing art work in this issue.  Next time you are at Barnes & Noble or your LSS check it out.  My thanks to Stampington for publishing my work!  Have a great weekend, take care~ Renee xxx

Tuesday, May 27, 2014

Artistcellar Stencils on Canvas

It is Tuesday so I will be sharing some work done with Artistcellar Stencils. I am also joining in at Eclectric Paperie today with their "Stencils" challenge.  If you get a chance pop over there and take a look at some of the entries, they're very inspiring.

I am using two different stencils on this mixed media canvas, one is taken from Jill K. Berry's Map Art Series.  I am using the small rose from the Global Compass Rose stencil.  The other stencil I'm using is from TCW, it is called Raindrops (TCW 400).  I have several canvases that I was not happy with the original work I did on them, so I just painted over that and started again.  I bought some of Dina Wakley's new Heavy Body Acrylic Paint last week and I've been anxious to try it out.  The color I painted on the discarded canvas is her Blackberry Violet color and I must say it is gorgeous, it has a really nice texture to it.  Here is the finished canvas and then I have a short tutorial showing how I did this in the event that you're interested.


First I painted my canvas with Dina's Blackberry Violet acrylic paint.  You can still see the outline of the feathers stencil underneath the paint from the original work.


Then I used a stencil called Raindrops with white gesso, I applied the gesso with a paint brush.


.  I lifted the stencil straight up to keep the design clean.  When I finished I made sure to wash the gesso off of the stencil and also out of the paintbrush right away.


I used the Rose stencil from Jill's new series and stenciled just the small rose with Modeling Paste.


This canvas became a little surreal when I turned it upright and then attached the digital art from Hidden Vintage Studios at DeviantScrap.com.


I sponged a small amount of black acrylic paint over the roses and around the edges of the canvas.  I attached a piece of black twine to the balloon and it is finished.  The entire canvas measures 7 1/2" by 9 1/2".

Thanks so much for stopping by, if you have a chance please leave a comment.  I love reading your comments.  Take care, I'll talk to you soon.  ~ Hugs, Renee

Thursday, May 22, 2014

I was published in Somerset Studio Gallery!

I wanted to share my news....I was published in Somerset Studio Gallery magazine for the first time.  It is a beautiful issue and has loads of great art in it, it was a real privilege to have two of my projects featured.


This is one piece that I made that was inspired by Dina Wakley's book "Art Journal Freedom".


They also included one of my art journal pages.  The image I chose to be the focal point is a piece of clip art found at DeviantScrap.com, it was made by ITKUPILLI Imagenarium.  Instant gratification, you can download what you like and size it according to your needs.  I love that company and all their artists, the prices are very reasonable, too.


My thanks to SS Gallery!  It is always a thrill to see my work in print like this.

We are getting a little rain today, everything in New England is blooming like crazy.  It has been a beautiful Spring.  My herbs are gorgeous and I should have pictures of peonies to share in a few weeks.  I saw my first hummingbird of the season today.  I hope you're all enjoying the weather wherever you are, take care.  I'll talk to you soon!  ~ Renee  xxx

Tuesday, May 20, 2014

Mixed Media Collage Canvas Using Artistcellar Stencils

This week I wanted to make a small house warming gift for a family with a young girl.  What do girls love?  SHOES!  That will be the focal point of my canvas.  I'll show you the finished project and then if you're interested it will be followed with a step by step tutorial.


I started out with a 6" by 6" white canvas.  I pulled the shoe out of my reject stash of projects since the young lady's bedroom is a lilac color and this shoe has just the right colors in it.  I made sure it would fit on the canvas first.


  I used the Fibo stencil from the Artistcellar Quasicrystals Series collection, some Pan Pastels and a cotton ball to apply color to the canvas.   I decided to use two colors of blue, Turquoise and Phthalo Blue Shade for the background.   I removed the shoe and placed the stencil over the canvas, I just applied the pastels with a cotton ball.


I knocked the canvas against a trash basket to remove the excess chalk and smeared some of it on the edges.  Then to tone the color down a little I used white gesso with another of the Quasicrystals Series stencils called Quasi.  


When the gesso was dry I could attach the shoe with pop dots.  I added the uplifting word "Fly" which is a Stampotique stamp on a piece of scrap paper.  I tore the edges of the paper and applied a little Distress Ink in the Tumbled Glass color.  The word is also attached with pop dots to raise it up a little.


It is always good to keep projects that don't turn out like you expected since they might be perfect later in a a collage of sorts like this one.  It saves you a lot of time and energy.  I had fun making this and I'm sure she will enjoy it.  Thanks for stopping by today.  I look forward to seeing you next Tuesday with more stenciling ideas. ~ Renee

Saturday, May 17, 2014

Final Day of the Art Auction!

This is the final day of the art auction "A CALL TO ART", it ends at 3:00 PM EST today.  If you haven't had a chance to check out the participating artists now is your chance.  The proceeds are going to support the education of girls world wide.


Marjie Kemper   http://www.marjiekemper.com
Lisa Pace   http://lisapace.com
France Papillon   http://www.france-papillon.com
Sally Lynn MacDonald   http://www.SallyLynnMacDonald.com
Marybeth Shaw   http://mbshaw.blogspot.com/
Jill Meyer www.jillmeyer.com
Kerry C. Mitchell http://kerrycmitchell.com
Barbara Lanza www.barbaralanza.com

Thanks for your support!  Hugs ~ Renee

Thursday, May 15, 2014

A Call to Art #BringBackOurGirls


Please take a look at this flyer.  If you can please log into the auction starting at 7AM today.  Jessica Sporn is sponsoring this online art auction to benefit the education of girls and women all over the world.  Jessica put the call out less than a week ago and it is amazing how many artists have responded with donations of art work for the auction.


I didn't have the time to make anything specifically for this event but I decided to donate one of my favorite pieces that I look at every day.  It is a small canvas, 6" by 6", a mixed media piece with melted crayons.  The digi art is by Rick St. Dennis.  I made a similar piece at the same time that appeared in Somerset Studio in their Circus issue.


  All the proceeds from the auction will be donated to a global campaign for girls' education.  I hope you will visit the site and take a look at some of the art work that has been lovingly donated by so many.

Take care~Renee


Marjie Kemper   http://www.marjiekemper.com
Lisa Pace   http://lisapace.com
France Papillon   http://www.france-papillon.com
Sally Lynn MacDonald   http://www.SallyLynnMacDonald.com
Marybeth Shaw   http://mbshaw.blogspot.com/
Jill Meyer www.jillmeyer.com
Kerry C. Mitchell http://kerrycmitchell.com
Barbara Lanza www.barbaralanza.com

Tuesday, May 13, 2014

Personal Art Maps with Map Art Series stencils

I am happy to share with you today the latest stencils released by Artistcellar called the Map Art Series by Jill K. Berry.  I happen to be a fan of Jill's work and have read her book Personal Geographies~Explorations in Mixed-Media Mapmaking several times now.  The stencils she has designed go hand in hand with the ideas she has shared in her book.  When I received the stencils I decided to do a map described in her book as a "map of experience".  My map is one that has charted my artistic journey which began for me in 2004 when Ink About It opened in Westford, MA.  My husband and I had moved to New England from California in 2001.    I was retiring and  I had a list of things I wanted to learn how to do that I had been putting off for decades, like most of us.  My map shows my personal journey.....I learned how to garden, made a quilt, baked pies for the Fair to earn ribbons, went snowshoeing, etc.  Then in 2004 I visited Ink About It and started making cards.  I won a small contest there which convinced me I should send my cards into Stampington magazines.  I was really surprised when they published the first cards I mailed in.  That encouraged me to stay on this artistic path, something I never anticipated.  Over the years I have been on several Design Teams and have made wonderful friends all over the world.  So this is my personal art journey.  You might think about your own journey and how you could map it out.

To make my personal art journey map I started with an old map street atlas that shows the town we live in, Bolton.  I used a Jane Davenport face stencil to draw the face with permanent ink.  I used the Angel Cartouche in the Map Art Series collection in the upper left corner as a frame for my title.


 I applied white gesso through the stencil, allowed it to dry and then wrote my title. ( I do believe Calligraphy lessons need to be on that bucket list!)  Even if you don't like your writing don't let that hold you back.
Next I wrote briefly about all the activities I've engaged in during the past twelve years and sometimes the things that caused me to stop doing them, like bears on my snowshoeing trails.  I then used the Sunny Compass Rose stencil with Memento markers to make a design at her throat.


I added details with the Global Compass Rose stencil using clear modeling paste.  The rose in her hair is from that stencil, too.  First I drew the design using the stencil with a red Memento pen and then stenciled over the color using Distress Stickles.


I added the tiny sun to show that we feel we've had enough of the cold, long winters here and are seriously considering moving south where the sun shines more often.


If you would like to try your hand at this type of art Jill's book gives you many different ideas.  The Map Art Series of stencils can be combined in many different ways to enhance that personal map.  There is a blog hop taking place right now that offers you an opportunity to win a set of these stencils.  I have posted the blog hop list here and all you have to do is leave a comment for a chance to win.

Thanks for stopping by, see you next Tuesday with more stenciling ideas ~ Renee

Friday, May 9, 2014

Craft Stamper Challenge~Potato Stamps

We're at the half way point for the Craft Stamper Take It Make It Challenge.  The challenge this month, in case you forgot, was to make your own stamp out of a potato.    This time I thought I'd keep it simple and just carve a primitive looking star.  Here is my finished card.  If you keep reading I'm going to show you step by step how I made this.


I used a simple kitchen tool, a paring knife, to carve a small portion of a potato into a star stamp.


I stamped my Zettiology image with Jet Black StazOn ink.  Then I stamped my potato star randomly all over the card.  It was inked up with Wink Of Stella Gold ink.  It has a nice sparkle to it that isn't really reflected in the photo.  I colored in the image using Smooch Accent Ink in Green Apple and Lettuce colors.


Using my Tim Holtz Tattered Florals die I cut flowers out of old book text and then distressed them with Antique Linen Distress Ink.


The centers were stamped with Walnut Stain Distress Ink and Delicata Golden Glitz ink.  I glued the flowers on the left side, stamped a phrase and trimmed it out.  It is also edged with the Wink of Stella Gold pen and popped up with some pop dots.  The words are from Dina Wakley's new stamp line.  The card was finished with the edges distressed with Vintage Photo Ink.  I showed a second option of the card if you added a little more detail with a black permanent ink pen and few more strips of  book text.

Option A

Option B

I hope you will take on the challenge, carve your own stamp and share it with us at the Craft Stamper site.  There are some great prizes to win and a chance to be published in their magazine!

Thanks for stopping by.  If you have a chance to leave a comment please do, I love to read what you think.  In the meantime, take care, talk to you soon ~ Renee

Tuesday, May 6, 2014

Mini Travel Journal using Artistcellar Stencils

Happy Tuesday!  Tuesday is the day when I do a short tutorial showing how I use Artistcellar stencils to make projects.  I am pretty hung up on the Quasicrystals Series of stencils.  I think their shapes lend themselves to all types of projects that need something to pull the page together and these stencils seem to do just that.  Summer is quickly coming and so many people love to travel during that time, myself included.  I like to have one place to store ephemera such as tickets, receipts, etc. during my travels.  I also like to make lists of places that I visit each day so this small journal is the perfect storage place.  It is small but expandable depending on the type of closure you put on it.  This is the finished project which will be followed by a short tutorial in case you want to make your own.


The finished journal measures 5 1/2" by 3 3/4".  I start with a piece of 140# watercolor paper measuring 11" by 15".  I generally use paper that has color already on it from a "failed" project and apply a thin layer of gesso over the existing color or design.  I like to see the colors bleed through the gesso in spots to add dimension and interest to the finished product.


I began with TCW stencil called Fancy Feathers designed by Ronda Palazzari.  I placed the stencil randomly on the paper, applied purple paint, moved the stencil and did it again.  Each time I tried to use a different feather pattern.


After drying the feathers thoroughly I used my Fibo stencil from the Quasicrystals series with some dark yellow acrylic paint.  I used the same technique of applying the pattern randomly across the paper.


When this was completely dry I began folding it into the book shape that I wanted.  First I folded the paper horizontally, opened it up and folded it vertically.


Each time I made sure the fold was sharp by using my bone folder.  I opened up the paper and made the last fold which helps to form the pockets later.  I folded each of the ends of the paper to meet the center fold and the pressed the folds in.


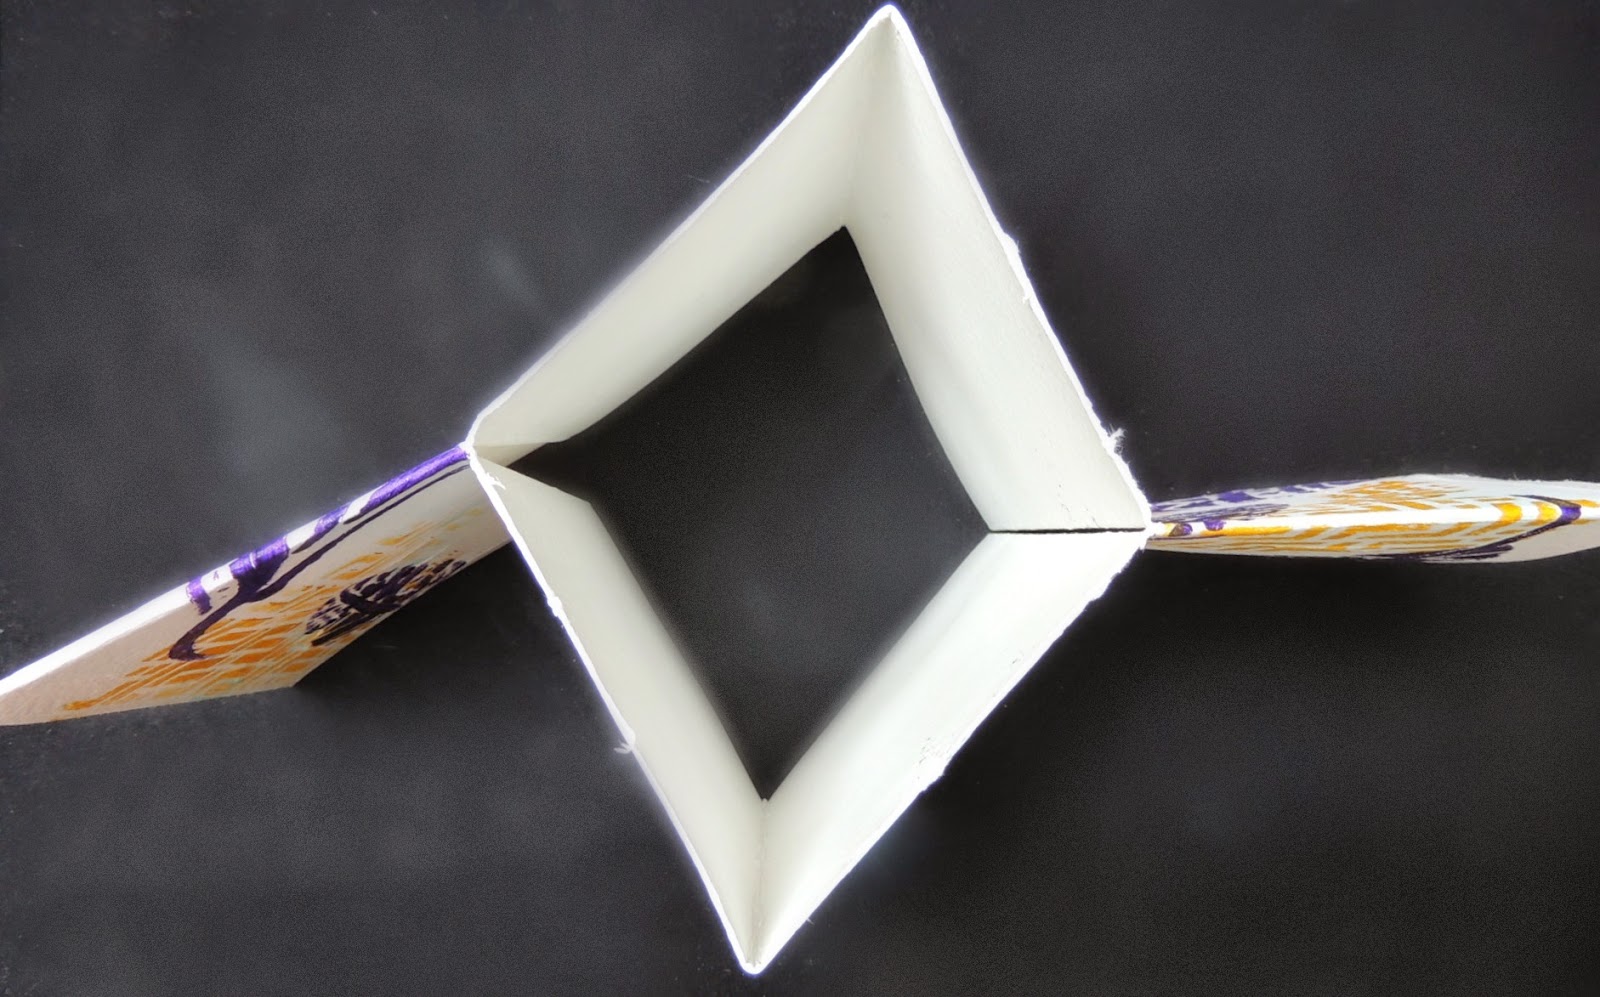
I opened up the paper and folded it wrong sides together horizontally. With the folding completed it is time to make the cut that allows the paper to fold right into the book shape.  I cut this with an exacto knife on a self healing pad, then I pushed the two ends together and it makes a  mini book with four storage area openings on the top.  Now to close any areas that are still open on the bottom and the sides of the book.


I turn the book so the top is open on each page.  That is where the tags and ephemera will slide easily into.  The openings on the sides and the bottom are closed with washi tape and stitching with a sewing machine.  You could close them with sticky back canvas or staples, hand sewing, whatever you choose.  I also opened the book to the middle section and stitched right down the middle.  At this point you can trim your threads or not depending on how "artsy" you want your book to look.


I continued to decorate my mini journal with Tim Holtz's rub-ons and stamps that reflect traveling.

Front and back covers

Pages one and two

Pages three and four

Pages five and six

I wanted the journal to be flexible so I put a closure on it that is elastic.  It is part of Tim Holtz's ribbon collection.  I cut the amount needed to keep the book closed and added a matching paper flower with a strong adhesive.


A book like this is fun to make with different stencils and perhaps colors that represent the area that you're going to visit.   Artistcellar offers so many fantastic design options with an array of stencils on their site, it makes being on their design team a real treat!

Thanks for stopping by today, I'd love to hear your thoughts so if you have time to leave a comment I'd appreciate it.  Take care,   Renee xxx

Friday, May 2, 2014

Craft Stamper Challenge::Potato Printing

It is time for the Craft Stamper May "Take It Make It" Challenge!  This is not only a good place to stretch  yourself creatively to use a technique that is out of your comfort zone but also to try and win some great prizes.  Here is the new challenge.....Potato Printing.

Technique: Revisit your childhood and get potato printing! Take any old potato and carve a shape that you can then use to print with. These prints can then form a background for your project. We will still need regular stamping on the project as well as the potato prints! The REAL challenge with this theme is to see if we can take a technique used by 3 year olds and turn it into something any arty grown up would be proud of! 

I've never done this before so here goes, I'll show you the finished product and then give you a short tutorial walking you through my process.


 I started by trying to carve something on the potato.  I quickly realized why I'm a stamper not a sculptor!
A simple flower and leaf shape seem to be the safest  bet for me.  I used the same tools that I would use to carve a rubber stamp, the smallest V-shaped lino cutter in the pack is my tool of choice.  After I had my design in place I used a paring knife to cut away the parts of the potato that I didn't want to print.   I put paint on the potato to see the parts I wanted to scrape away.


My leaf


My flower

I looked around in my stash to find a large tag that already had a Pan Pastel orange background with some aqua acrylic paint stenciled randomly on it.  Gesso seemed to be the best medium for me to work with so I painted white gesso on the flower and black gesso on the leaf.  I turned it over and pressed down firmly onto the tag to make a print.


To finish the project I added yellow acrylic centers to the white flowers, which turned a little orange and outlined them with a black permanent pen.  Then I stamped Dyan Reaveley's text circle in the center of each flower.  I thought the one word stamp "Serendipity" on an old Stampers Anonymous stamp seemed fitting.  I wiped off the excess yellow paint on the tag randomly to tie it together.


A few ribbons laced through the tag top and it is finished.


The potato art project produced by Helen Chilton for this Craft Stamper Challenge is truly a work of art.  You might want to take a peek at her work in the latest Craft Stamper magazine, it is extraordinary.  Please give it a go and enter your masterpiece at the CS "Take It Make It" Challenge for May.  You can go directly there from HERE.

Thank you so much for stopping by today!  I hope to see your creations posted through out the month of May.  In the meantime, take care.  Hugs~Renee